How to Upload an Image in Daz Forums
Posts Tagged 'DAZ Studio'
Daz Studio Thumbnails
Sometimes the thumbnails that our content artists provide aren't very helpful, or we'd similar to have thumbnails for our own files, or perchance a folder named "Lilly's Dress" isn't enough to remind yous what the dress looks like and yous're tired of opening the folder to find out information technology wasn't what you're looking for. This article is to provide some guidance on how I use thumbnails in Daz Studio to brand finding content easier.
Minor Rant: At that place are some vendors who have taken to creating their thumbnails as "clay" renders without textures. This is really unhelpful when and so many skirts and dresses are similar in shape. Without the textures it's difficult to tell some pieces apart. Even worse is when it's non only a clay render, but a closeup of the neckline of a top or the waist of a skirt and I can't even see the full production.
Thumbnail Sizes
Daz Studio has two thumbnail file standards. The first is the standard thumbnail that shows upward in your Content Library and Smart Content panes. The second is an optional "tip" file which will exist displayed (along with other information near the item) when you hover over a file in the content trees.
- *.png – 91 x 91 pixels – This is the standard thumbnail that you're used to seeing.
- *.tip.png – 256 x 256 pixels (standard) – This is the image that is shown in the popup information when you hover over an item. If it doesn't exist, Studio reuses the standard thumbnail. Also, technically, it can be larger than 256 pixels square. 256 x 256 is just the standard Daz enforces when content is existence submitted.
Example
If I have a production chosen "Lilly's Dress", and I browse to the folder on my difficult bulldoze where that product is stored in my content library, I may find the post-obit files:
- Lilly's Dress.duf
- Lilly's Clothes.duf.png
- Lilly's Dress.duf.tip.png
Note that technically, the thumbnail files can also drop the ".duf" part of the file proper noun and they will however piece of work. This is an important point that nosotros'll come back to after. It's only really required if y'all happen to accept 2 or more than files with the same root filename (e.thousand. "Lilly's Dress.duf" and "Lilly's Dress.dsa") and yous want to accept different thumbnails for each file.
Tip: The fastest way to find the files on your hard drive may be to just right-click on the file in the content library view and choose "Scan to File Location".
Creating Thumbnails
If you don't like the thumbnails that exist, or Studio didn't create a thumbnail (for instance if you save a scene, it may non create a useful thumnail for the .duf file for that scene), it's easy to create your ain.
All I practice is to setup a camera with my return settings to return a square (1:1) image at 256 pixels. Unremarkably you don't want this to be very creative; and then a vivid scene that lets you lot conspicuously see what you're rendering the thumbnail for works best. I will save this render as "<production/scene/whatever>.tip.png" (due east.g. "Lilly's Clothes.tip.png").
Then I will create a copy of the file and call that "Lilly's Dress.png". I edit that with my editor of choice (unremarkably GIMP). I may choose to just resize it down to 91×91 or I may ingather it get-go. I peculiarly practice that on my character presets that I salvage where the principal thumbnail I may just want a head and shoulder shot, merely the tip thumbnail is a full body shot.
Then I copy these PNG files into the binder where the product is stored. Y'all may either demand to overwrite the existing thumbnails or remove the ".duf.png"/".duf.tip.png" files to get yours to testify.
Saving Thumbnails
One matter that'due south important, if you're going to be overwriting the thumbnails the vendor provided is that you should save them somewhere! This is because if there's always an update to that product, in that location'due south a high probability that the update will overwrite your customized thumbnails. I have a folder tree on my difficult drive where I store customized thumbnails so I can go back and catch them after DIM updates my files.
Folder Thumbnails
I'm non a big fan of using Smart Content. I have as well many old things or stuff I accept customized that I'm just not confident that Smart Content will find for me. So I tend to apply the Content Library view a LOT when I'thousand browsing my stuff. One consequence I have with that is that I'll be looking at "My Content Library\People\Genesis viii Female person\Clothing\" and run into a binder called "Lilly'south Clothes". But I may not recollect what that clothes looks like. Fifty-fifty worse can exist when the name is something similar "Sassafina" and I don't even remember if information technology's a dress or a pair of shoes!
This is where that point I mentioned above about the ".duf" non being important comes into play. We tin create thumbnails for folders in our content libraries. The all-time part is that these ones won't typically be lost either if there'southward an update to the product. The exception to this rule would be if the folder is renamed or moved in the content library folder structure.
One thing I do periodically is to find folders where I just have the default Studio folder icon and supervene upon it with a thumbnail that represents the product. Most often I will utilize a thumbnail that is either already part of the product or material settings, but sometimes I return them myself if those aren't very helpful. Remember that if you do want to re-apply an existing thumbnail, y'all may need to strip the ".duf" role of the filename equally everything before the ".png" must be exactly like the binder name.
All you accept to exercise is put the PNG file in the proper location and name it the same every bit the binder. And then for the example I continue using, I would put a thumbnail file called "Lilly'due south Dress.png" in the "D:\My Content Library\People\Genesis 8 Female\Clothing\" binder on my hard drive. Now when I browse to that part of my Content Library, I volition see a motion-picture show of the clothes instead of only a folder icon side by side to "Lilly's Dress" in the Content Library tree.
Wrap-up
I hope this information is helpful to some of you lot. Please feel gratis to mail service a comment/question here or at DM me at JonnyRay over on the Daz Forums.
Daz Studio and Backgrounds
Another topic that comes upwardly often in the Daz Forums is adding backgrounds to 3D images. While I wrote up a quick guide to my views on the ways to do this in the Question nearly skydomes and other types of backdrops thread, I thought I would expand a flake here to discuss what I see and the strengths and weaknesses of the diverse options. I link to a few images where I have used these techniques
HDRI images
HDRI Images are piece of cake to use in Iray rendering (and not terribly difficult anymore in 3Delight) and probably the well-nigh common way correct now to add a sky or background to your image. They have a few advantages in that they completely surround your scene, provide lighting which automatically matches your background (no more shadows going left in the background when the lighting on your effigy casts a shadow to the right), and often include a ground texture for a total environment. The drawback is that the quality of the HDRI volition drastically affect your experience with them and you are somewhat limited in how y'all place your figures and props within them since yous can't move the dome. Too they have to specifically be designed to support Depth of Focus (DOF) from your photographic camera; so most of them will be sharp and in focus despite looking similar the groundwork is far away from your figure.
If yous're going to apply HDRIs from a source like HDRI Haven yous will do yourself a favor to become used to the options for either Infinite or Finite sized HDRI domes. Also tools like the IBL Master and Iray HDRI Toolkit will assistance y'all employ HDRIs more easily and get more value from them.
Images like Neko's Lazy Sunday and Jogging in the Park are only using HDRI images for the backgrounds.
Backdrop
If you want to use the Properties feature (Environment Tab (non to be dislocated with the Environment tab in Render settings) – select an epitome for the background instead of a color), you lot tin can do it, yous simply need to edit the image y'all're going to use to exist the size of your render. That will avoid any distortion of the paradigm when Studio tries to make it fit the background.
I used that technique for my Neko in Venice paradigm. The chief reward to the backdrop over the apartment primitive is that it is technically "exterior" your scene; so you lot don't accept to worry about it blocking lights. It also "follows" your camera so you can modify camera angles to frame it the manner you'd like without having to motility the aeroplane behind it.
The drawback is that if you change your mind about how you want to frame the epitome and information technology affects the cropping or aspect ratio of the background, you'll accept to re-edit the background image to map to the new dimensions.
Apartment Archaic with an Image
For flat backdrops, when you have a specific camera angle already setup, using a archaic aeroplane and putting the image on there is the nearly flexible. Y'all can size the airplane so that the image has the proper proportions and motion it effectually to utilize merely the portion of the background that you want in your render.
The drawback is that you have to pay attention that information technology isn't getting in the style of any lights or props you have in your scene. Also, if you lot move your camera, yous may need to re-position the plane to align with the new camera angle.
Curved Primitive with an Image
Several environment sets for sale use these. The reward over the flat primitive is that the background curves around your fix so you aren't limited to simply shooting in i direction. This is particularly useful when yous're shooting an indoor scene and want to have something outside the windows but don't want to be express in your photographic camera angles.
While it is more flexible to camera angle adjustments than the flat plane is, you could still encounter cases where moving your camera means you need to motility the properties as well.
Skydomes
By this I hateful the "old" way nosotros used to do this which was to create a big half-sphere which covers your entire scene and has an image mapped on the inside. Advantages here are that I go the flexible photographic camera angles similar the curved primative, I can move and re-size the dome to adjust to my scene unlike HDRIs, and I become the full sky and surrounding surroundings. Drawbacks however are that I won't become a ground like with near HDRIs.
Also, these tin cause problems when you're rendering with Iray. For instance, if yous set your Return Settings / Surround to use Sun-Heaven or load an HDRI sky image thinking it will provide daylight, technically Iray will retrieve at that place's a solid dome covering everything; and so the lite yous're expecting to come from the Iray environment settings will be blocked past your skydome.
This is one of the more common reasons we encounter people coming to the forums and asking why their lighting isn't working on an older surroundings set.
Cylcloramas
For example, the "Millenium Environment" that comes with Studio. These are really falling out of favor. They accept an advantage of providing true depth where some elements are closer to the camera than others. And they are lightweight environments on your calculator because all of the background items are pre-rendered flat props instead of full 3D geometry, but you take to be REALLY careful most lighting and photographic camera angles or the illusion is spoiled; and then they aren't very flexible.
No Backdrop
Finally, I'd exist remiss if I didn't also mention that many people will choose to render without a backdrop at all and composite their render over a 2D prototype using something similar GIMP or Photoshop. Since those 2D paradigm editors provide other tools as well for postwork, this tin can be a great option and is a technique I used for my Walking a New Path image in the gallery. If you're doing this, you lot'll probably want to learn a little about Iray Shadow Catchers because casting realistic shadows on the backdrop is the trickiest part to this technique.
Summary
In that location isn't necessarily any "right" or "incorrect" to any of these options. They are choices that y'all make as the artist to what fits best with the epitome you're trying to create. I've given what I see as the strengths and weaknesses, simply y'all will take to experiment a little and cull for yourself.
My Daz Studio Workflow
I've typed this mail service multiple times on the official Daz 3D Forums; and so I thought I'd write it upwardly here so I tin just refer to it instead. Maybe this will help some people or at least give y'all some ideas about how to create your own workflow that works amend for y'all.
My Scene Cosmos Workflow
As for my overall workflow, I tend to build scenes using this process. Sometimes I curt cut it if I'm doing a quick scene "just for fun", just anytime I desire a quality result, I employ this process.
- Scene Blocking
- Get-go I'll figure out the setting (surroundings) and crude camera angle I want to use. I make certain to use an bodily photographic camera and not just the perspective view or so I don't lose the blocking of the prototype.
- I may also crude in the lighting at this fourth dimension similar adding HDRI skies and other lights I call up I'll need.
- I save this as a scene, and starting time a new ane.
- Character Setup
- I load one of the gray background HDRI presets from Colm Jackson's PRO-Studio HDR Lighting bundle. I like the even, low-contrast lighting for character setup.
- I load my first graphic symbol I'm going to apply, tweak skin, eyes, add hair and clothes.
- A recent improver to my workflow is to add Canary's Cameras as they provide a quick way to look at my character setup from multiple angles. Saves me a lot of fourth dimension.
- I will do several test renders to make sure things expect okay rendered.
- If the grapheme is going to pose by themselves in the scene, I may choose a pose for them at this stage. If they will be part of a "couples" pose, then I leave them in default.
- I relieve this as a "Scene Subset" rather than a "Scene" because the Subset won't include the HDRI I loaded for the setup or any cameras I created for test renders. (Refer to the annotation about Scene Assets beneath for an alternative for often used characters.)
- I echo the above for each character in the scene.
- Optional – Couples Posing
- If the characters are going to be posed using a couples pose, I'll create a new "grapheme setup" scene with my standard HDRI
- So I import the Scene Subsets for each character and utilise the couples pose to them.
- I will accommodate the poses if necessary, doing some quick renders to make sure that the intersection of characters, article of clothing, etc. looks right. V3Digitimes' Ultimate Pose Primary has made this procedure And so much easier and quicker for me!
- And so I create a grouping with the two characters and relieve this every bit a new Scene Subset, excluding any cameras and lights I added.
- Character Placement
- At present I'll reload the original scene and merge the grapheme and/or couple scene subsets into the master scene and movement the characters into their positions in the scene
- This is where the couples group comes in handy because I tin can movement them together without having to adjust each one individually
- At present I'm tweaking poses, adding or removing other props, etc. to get the concluding look for the image I want.
- During this time, I use the Aux viewport set to my main photographic camera view while I'm using the Perspective View to motion pieces, suit poses, etc. That fashion I can see how the changes look from the main view.
- I also bandy from Perspective to Principal Photographic camera on my total viewport to make sure I'm getting the results that I'm trying to and that I'm not spending likewise much time on something that won't fifty-fifty show in the terminal render. I can't tell you lot how much time I wasted trying to become a paw to exist in the correct place but to realize it was blocked from the photographic camera anyway and nobody would find all the time I spent getting the fingers to just lightly bear on the other grapheme's waist.
- Lighting
- Once everyone is in place, I start tweaking my final lighting, doing exam renders and adding Ghost Lights, etc. to become information technology looking correct
- With some renders, this is the longest part of my process as I experience the lighting has the greatest impact on the overall quality of my images
- Final Render
- I always do my terminal renders using Iray canvases, fifty-fifty if I simply intend to use the Dazzler pass. Canvases contain richer data about the image and so are a improve basis for any mail processing I want to do.
- For higher quality images, I'll besides create canvases for each light source so that I can suit their strength in the postwork
- I too ever render about 20-50% larger than I want the final image to be. That allows me to downsample the image post-return which tin assist reduce any remaining "racket" in the image.
- If my goal is the highest quality I tin can produce, I'll disable Iray Tone Mapping and set the render quality settings to 100% convergence, Quality factor of 8, and both max samples and max time constraints to max values to permit the render to get every bit long as necessary.
- Postwork
- I utilize GIMP to import the EXR files from the Iray canvases and perform exposure adjustments, layering the light layers, etc. I save this as a GIMP file so I can come up dorsum to it if necessary.
- I will consign the image equally a PNG in information technology's full size, then open the exported file and resize information technology. This way I don't mess upwardly the post process file I saved in the previous pace.
- Even though I calibrate my monitors regularly, I've found that mobile devices brandish them much differently; so I'll open the final file on my mobile telephone and utilise Adobe Lightroom to perform final tweaks to the exposure and colour remainder settings before I post it anywhere.
An Aside about Support Assets
For frequently used characters, consider using the "Save As -> Back up Nugget -> Scene Asset". This has a value over saving a scene or scene subset in that updates to the components of the scene are reflected in scenes that use them. To put information technology more than conspicuously, if you take a character you lot apply oft that is setup using Aiko eight with OOT's Linda Ponytail pilus. You go her basic setup and save her as a Scene Nugget (let's telephone call her Aikolinda). Then y'all load Aikolinda into one (or more) scenes y'all're going to render. And so you make up one's mind you don't similar her as a blonde and desire her to be a redhead. If you lot go back and update Aikolinda with the new pilus color, that alter will automatically be reflected in every scene you loaded her into. If y'all had saved her as a Scene or Scene Subset, you'd have to apply the hair color change manually to every scene yous used her in.
Daz Studio 4.10 Iray Viewports
Note: A lot of this data is taken right out of Daz 3D'southward Getting Started in Iray tutorial video on YouTube. If you learn better from videos, yous might find that helpful.
The Problem
I've seen repeated questions about improving functioning of the Iray drawing style in Daz Studio four.10 viewports. Imagine my surprise when I was watching the Getting Started in Iray tutorial video and found a wealth of information already bachelor on the topic!
Photograph realistic rendering in the Daz Studio viewports can tiresome down fifty-fifty some of the fastest computers out there because Studio is trying to interactively create a "last" image and has to recalculate calorie-free paths, fabric interactions, shadows, and such each fourth dimension you lot move your view or relocate content. This tin crusade people to experience similar the programme is really sluggish and/or that information technology causes everything else on the computer to grind to a halt every few seconds.
Interactive to the rescue!
Technically, NVIDIA Iray has 2 modes that it can render in. The 1 that is the default and we're most familiar with is Photoreal. With only a few exceptions, this will exist the mode yous want to use for final image rendering.
There's another style called "Interactive" which has many of the same features as Photoreal. However, because it lacks support for computationally expensive features like subsurface scattering and caustics, it will generally render much faster.
Rendering Devices
On the Advanced tab of your Render Settings, you have the option to select which devices (CPU or graphics cards) can exist used to perform Iray renders. There are separate selections for Photoreal verses Interactive. Personally, I don't mind if Studio has to neglect over to my CPU for a large final render, but for Interactive mode that we're using on viewports, it's probably amend to uncheck the CPU. This will also stop the Iray engine from grabbing the CPU for rendering purposes and slowing everything else down on your computer.

NVIDIA Iray Rendering Devices in Daz Studio 4.10
Render Settings
While we're on the Render Settings, get dorsum to the Editor tab, Return Mode and change this to Interactive. Technically you might recollect this would ONLY impact if you're doing a final render. However the Daz Tutorial indicates that Rendering Way and Draw Style are linked in some way; then it's best to set this setting to Interactive as well.
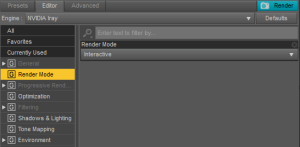
Choosing between Photoreal and Interactive modes
Just don't forget to switch it BACK before you lot do your last rendering!
Draw Settings
Next is setting the drawing style for your viewports. There's a expert risk you don't have the Draw Setting tab open in Studio. Get to your Window menu -> Tabs and select Describe Settings. You can dock it wherever it feels about natural to you.
Too, you will demand to repeat the steps below for each viewport that you're using Iray in. Most of the fourth dimension, I will ready my Auxillary (Aux) Viewport to Iray so I e'er have a rendered looking prototype to refer to even if I'm using Texture Shaded on my main viewport. Draw Settings changes focus for each active viewport that you click on; so brand this changes in whatever viewport using Iray.
Draw Mode
Go to your Draw Settings tab, Cartoon section and change the Describe Mode from Photoreal to Interactive.

Setting the drawing fashion on the current viewport
Response Threshold
When yous're using Interactive Depict Mode, Studio will pixelate your image when y'all offset moving your view around and so will resolve it back to a rendered epitome when y'all cease. Response Threshold tells Studio how sensitive to be to view changes earlier it changes to the pixelated view. The lower the number, the more quickly it decides to pixelate the image. Higher numbers make the Interactive rendering engine piece of work a little harder, but if your graphics menu tin handle information technology, information technology's probably less annoying for you. Y'all may need to play with that value to find a number that works for yous.
Manipulation Mode (optional)
If you observe the pixelated image even so feels too sluggish when you're navigating around your scene, you can choose how the content brandish changes when the Response Threshold is exceeded. Every bit I mentioned, by default it pixelates the image, but from the Describe Mode tab, General, Manipulation section, you can choose to apply either wireframe or solid bounding boxes instead. This is some other option for those who are using slower computers or if you have a very large scene with a lot of detailed content.

Choosing how Daz Studio draws content while moving the view
Conclusion
I promise this information is helpful to someone. The Tutorial video covers a few other pointers on using Iray as role of the scene setup process. I highly recommend it to anyone getting started in using this tool.
DS Content Management (Characters)
I've seen some posts lately in the Daz 3D – New Users forum virtually people wondering about how to organize their content. While things similar Smart Content and Content Categories have made this a lot easier than information technology used to be, I nonetheless observe myself typically browsing the content folders.
Then, to make things easier on myself, there are some standard things that I exercise to make content easier to notice. In this entry, I'll talk about how I move / copy / rename folders for my main characters.
Caveats
- The method I'm most to talk about does have a drawback. When there is an update to something that was moved, you will need to go and repeat the move / copy of files and folders. I'll embrace that more at the end, but if you don't desire to have to remember to update your folders and files afterwards a production is updated, this may not be the method for you.
- This represents how MY mind thinks about content and what's of import. while information technologymight work for you too, I'm sure there are other means to achieve similar goals
My Trouble
I have three problems when I'm looking for a character to use. Offset is that when I'm looking for characters, the names of the folders aren't e'er sufficient. 6 months later on I bought it, remembering that Giada is a young teen looking girl based on Aiko 8 is almost impossible for me.
Second, fifty-fifty if I do remember the character's proper noun I'chiliad looking for, the number of clicks to get there is annoying. I'd rather accept my base of operations characters available at a higher level in the structure.
Finally, I find it annoying to accept all those folders with the default folder icon. Wouldn't information technology be better to have the character's headshot instead of a folder?
DAZ Default Character Folders
By default, DAZ wants to organize your character folders like this:
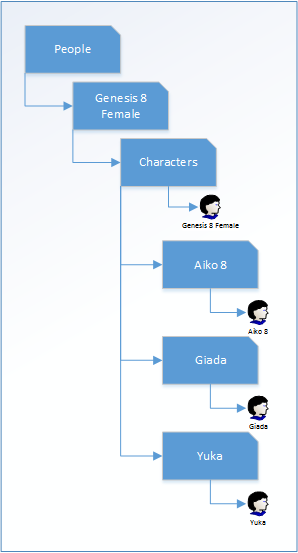
The default arrangement of how folders and files are saved for character content in DAZ Studio
And so, to load Aiko eight, I'd accept to click on People, Genesis 8 Female, Characters, Aiko 8, and then I find the Player file to load her. Also, unless I magically recollect that Giada and Yuka are 2 Aiko viii variants, I might have to click on each one, see their icon and then my memory is jogged.
My Character Folders
I volition depict the deportment I take on my character folders beneath, merely here's a diagram of the changes I make.

How I copy and rename character folders and files
My Arroyo
Several key steps here in what I'g doing with this organization.
- All of the main characters start with an assertion indicate (!). Since Daz Studio sorts things alphabetically for you lot in the content binder view, this will forcefulness all of the main characters to the pinnacle of the list.
- I copy of all the actor files (and their thumbnail png files) to the Characters folder. This does two things for me.
- Offset, it means I tin see all of my Genesis 8 Female characters in a unmarried folder
- Second, since the Actor file and the folder proper name are the same, information technology changes the icon on the content browser from the default binder to the character'southward Player thumbnail.
- If the character is some other layer down (say for example with Giada, the folder path might accept been People> GF8 > Characters > FWSA > Giada), then I motility the whole folder upwardly one level. While I capeesh the attempt that Fred Winkler and Sabby put into their character, the "FWSA" folder is just an unnecessary click to go to what I really desire.
- For characters that are derived from ane of the base grapheme shapes, I add together a prefix to the folder, role player, and thumbnail filename. For example, since Giada's Production Page says that she requires Aiko eight, I add "A8" to the folder and file names. This helps me group my characters into basic families of similar body shapes. Also, in order for the thumbnail trick to work, both the player thumbnail file and the folder take to be exactly the aforementioned. Other prefixes I've used include:
- Genesis 8 Female person = G8F
- Victoria viii = V8
- Olympia viii = O8
- Charlotte eight= C8
- The Daughter 8 = TG8
- … you lot get the idea.
More to Come
Equally I said, this is a method that works for me. If it at least gives you some ideas on how to help you get your hands around the 3D Content that y'all own, then I'm glad I helped. Experience free to post questions here or, if you're on the Daz 3D forums, drib me a PM at JonnyRay.
I will go along adding other categories of content to this series. Cheque my Content Management category for other like posts.
Source: https://karl3d.wordpress.com/tag/daz-studio/
0 Response to "How to Upload an Image in Daz Forums"
Post a Comment